Category: Stair Geometry & Design Fundamentals

The foundation pillar for everything else on this site. Guides here break down rise, run, riser height, tread depth, going, pitch, headroom, nosing, and the stair comfort formula (Blondel’s Formula) — the core measurements that decide whether a staircase is safe, comfortable, and code-compliant before you ever pour concrete or cut a stringer. Start here if you’re designing a new staircase from scratch.

  • Stringer Calculations Explained: How Many Steps Fit Your Run

    Stringer Calculations Explained: How Many Steps Fit Your Run

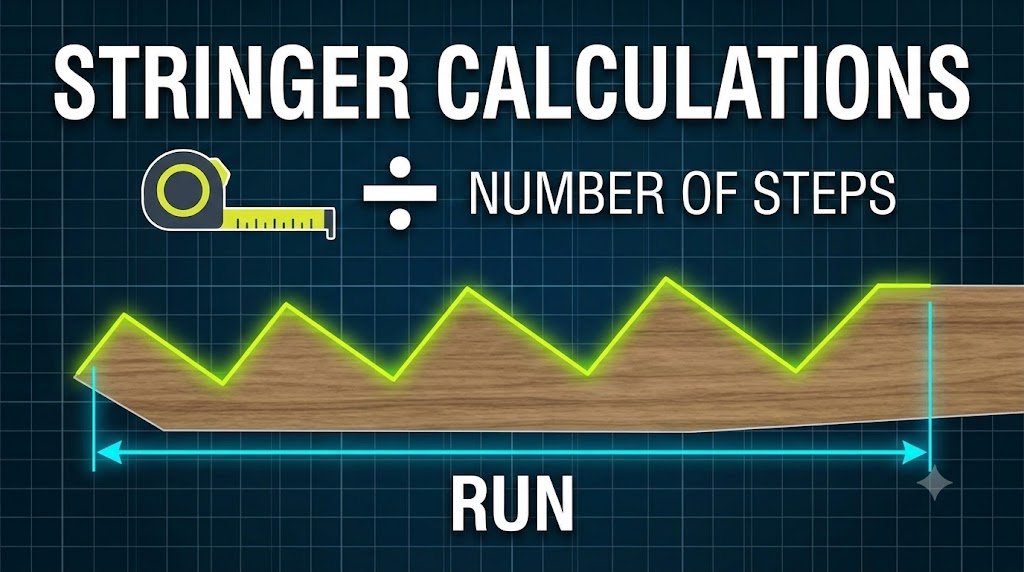
    Step count comes from one formula: total rise ÷ target riser height, rounded to the nearest whole number. Then you reverse it, dividing total rise by that rounded step count, to get the actual riser height every step will use. That second number, not your original target, is what goes on the stringer layout, and it’s the step builders skip most often.

    The Stringer Math, Worked Through With Real Numbers

    Take a common scenario: a deck with a 108-inch total rise (floor to floor) and a target riser height around 7.5 inches, near the comfortable middle of the IRC’s 7¾-inch maximum. Divide: 108 ÷ 7.5 = 14.4. You can’t build 0.4 of a step, so round to 14 steps. Now reverse the calculation: 108 ÷ 14 = 7.714 inches per riser, which rounds to about 7 11/16 inches (196 mm) in practical framing terms. That 7 11/16-inch number, not the original 7.5-inch target, is what every riser on the stringer actually measures, and it needs to fall within the same 3/8-inch uniformity tolerance across all 14 steps.

    Run this through the Stair Stringer Calculator before cutting, since it also handles the horizontal side of the layout: tread depth × (step count − 1) gives total run, and the diagonal stringer board length comes from the Pythagorean relationship between total rise and total run. For the 108-inch rise example above, paired with a 10-inch tread depth, the run works out to 130 inches (13 treads of run, since the top tread is the landing itself), and the stringer board needs to span roughly 169 inches of diagonal length before you account for the tail cut past the last riser.

    One detail that catches people who do the math by hand: step count from rise ÷ riser gives you the number of risers, which is one more than the number of treads if the top of the stair terminates at a floor or landing rather than a final tread. A 14-riser stair has 13 treads cut into the stringer, because the 14th “step” is the upper floor itself.

    Step Count Across Different Total Rise Scenarios

    Total RiseTarget RiserSteps (rounded)Actual RiserStringer Diagonal (10″ tread)
    96 in7.5 in137.38 in150 in
    108 in7.5 in147.71 in169 in
    120 in7.5 in167.50 in188 in
    144 in7.5 in197.58 in227 in

    Notice the 120-inch row: rise divided cleanly by 7.5, so the actual riser matches the target exactly. That’s the exception, not the rule, most total rise measurements won’t divide evenly, which is exactly why the round-then-reverse method exists. Skipping the reverse step and cutting every riser to the original target height is the single most common stringer-layout error in residential framing.

    Common Mistakes

    Cutting risers to the target height instead of the recalculated actual height. This is the error the table above illustrates directly: if you target 7.5 inches but your rounded step count actually requires 7.71 inches, cutting every riser at 7.5 inches leaves the top riser short or the flight physically not reaching the upper floor. Always use the reverse-divided number, not the target, for every riser cut.

    Forgetting finished flooring thickness in total rise. Total rise should be measured from finished floor to finished floor, not subfloor to subfloor. A ¾-inch hardwood installation on the upper level, measured against a bare subfloor at the bottom, throws every riser height off by that ¾ inch across the whole flight, a classic cause of a top or bottom riser that fails the 3/8-inch uniformity check.

    Mismatched top and bottom risers. When a stringer pattern gets traced from an existing template rather than laid out from measured total rise, the first and last risers frequently land outside the 3/8-inch tolerance from the rest of the flight, because the template doesn’t account for this specific project’s floor-to-floor distance. Measure total rise on site before cutting, every time, even when reusing a proven stringer pattern.

    Not accounting for nosing overlap in tread layout. Tread depth on the stringer is measured horizontally between riser faces, but the nosing overhangs into the space above the riser below it. Builders sometimes lay out tread depth as if the nosing adds extra run to the stringer, when it actually sits within the vertical plane of the riser below, adding no horizontal distance to the total run calculation.

    Related Calculators You Might Need

    Stringer layout depends on getting the upstream numbers right first. Start with the Number of Steps Calculator if all you have is total rise and a target riser height, then confirm your riser and tread dimensions individually with the Riser Height Calculator and Tread Depth Calculator. For the full geometry in one pass, including stringer angle, the Stair Rise and Run Calculator combines all three. Once your cut list is finalized, the 2×12 Stringer Board Calculator tells you how many boards to buy and how to lay out the cuts to minimize waste.

    Frequently Asked Questions

    How do I calculate how many stairs I need?

    Divide your total rise (floor to floor, in inches) by your target riser height, then round to the nearest whole number, that’s your step count. For a 108-inch rise at a 7.5-inch target, 108 ÷ 7.5 = 14.4, which rounds to 14 steps. Run the numbers through the Number of Steps Calculator to skip the manual rounding.

    Why is my actual riser height different from what I planned?

    Because total rise almost never divides evenly by your target riser height. Once you round to a whole step count, you have to divide total rise by that rounded number again to get the real riser height every step will use, and that number is usually a fraction of an inch off from your original target. This is expected, not an error.

    How long does my stringer board need to be?

    Longer than the straight-line distance between top and bottom, since the stringer runs diagonally. It’s calculated from total rise and total run using the Pythagorean relationship, then a few extra inches are added for the tail cuts at each end. A 108-inch rise over a 130-inch run needs roughly 169 inches of stringer board before tail allowance.

    Do I count the top floor as a step?

    No. Your calculated step count includes the number of risers, and the top floor or landing serves as the final riser’s landing point, not an additional tread cut into the stringer. A 14-riser stringer has 13 tread cuts, not 14.

    What happens if I round the step count down instead of up?

    Your riser height increases instead of decreasing, and if it pushes past the 7¾-inch IRC maximum, the stair fails inspection outright. Always check both rounding directions against the maximum riser height limit before finalizing step count, especially on tighter total-rise scenarios where rounding down is tempting to reduce material cost.

  • Tread Depth Explained: How Deep Should a Stair Step Be?

    Tread Depth Explained: How Deep Should a Stair Step Be?

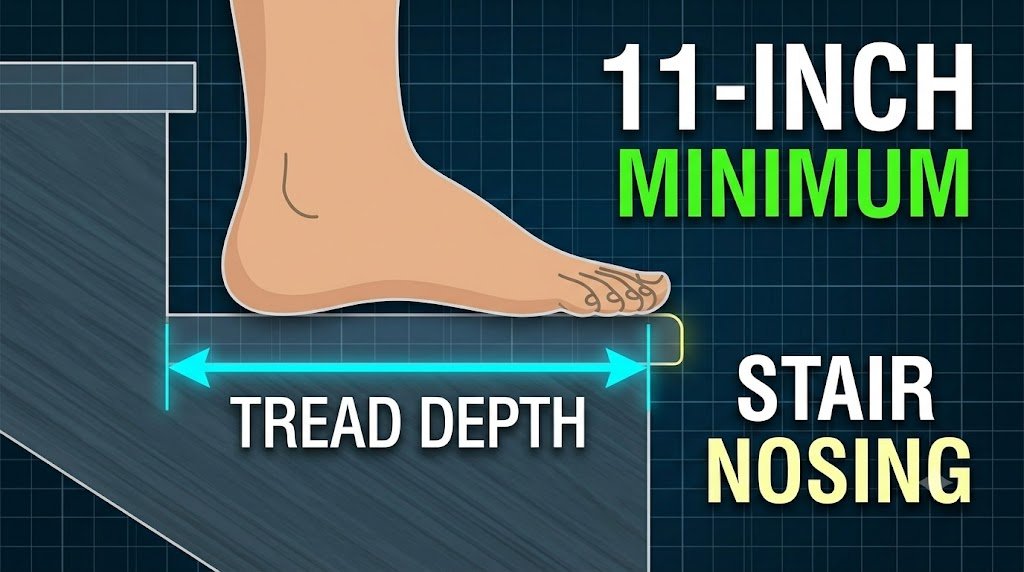
    The 2021 IRC sets minimum residential stair tread depth at 10 in / 254 mm (R311.7.5.2), measured horizontally between the leading edges of adjacent treads — build shallower than that and the stair fails inspection before comfort is even part of the conversation. In practice, most builders target 10.5–11 in / 267–279 mm, because the bare code minimum leaves almost no margin for a natural adult stride. Tread depth and riser height are locked together: change one and the other has to move to keep the stair walkable, so it’s worth checking both at once with the tread depth calculator before you settle on a layout.

    How to calculate tread depth for a real stair

    Tread depth is driven by two things: how many treads the flight needs, and how much horizontal run you actually have to work with. The formula is tread depth = available run ÷ number of treads, where the number of treads is always one fewer than the number of risers. Take a real case: a floor plan allows 11 ft / 3.35 m (132 in) of horizontal run for the stair, and the riser calculation for this flight already fixed the design at 15 risers, meaning 14 treads. Dividing gives 132 ÷ 14 = 9.43 in / 240 mm per tread — below the 10 in IRC minimum, so this layout fails as drawn.

    Solving it the other direction usually fixes the problem. Set tread depth at the 10 in minimum and multiply by 14 treads: 10 × 14 = 140 in / 3.56 m of run required — 8 in more than the floor plan currently allows. That’s the real trade-off tread depth forces: either the stairwell footprint grows, the riser count changes to shift how many treads are needed, or the layout turns a corner with a landing to recover floor space. Once you’ve resolved riser count with the riser height calculator, tread depth is the number that tells you whether the stairwell as planned actually fits.

    Why tread depth is measured the way it is

    Tread depth under the IRC is measured horizontally between the vertical planes of the foremost projection of adjacent treads — in plain terms, nosing edge to nosing edge, not the flat part of the board you can see when standing over it. This trips people up because a physical tread board can look 10 in deep while the code-measured depth is shorter, if the board’s front edge doesn’t actually project past the riser below it.

    Nosing changes the picture further. A nosing that projects 3/4–1.25 in / 19–32 mm past the riser face under R311.7.5.3 adds to the code-measured tread depth without lengthening the stringer cut itself — this is why some 9 in stringer cuts still pass as a legal 10 in tread once the nosing overhang is factored in. The relationship between riser and tread also isn’t arbitrary: a taller riser needs a shallower tread to keep the total stride length constant, which is the same logic behind Blondel’s comfort formula (2R + tread ≈ 24–26 in) — worth checking with the stair comfort formula calculator once tread depth is set, since a stair can be fully code-legal and still feel awkward to climb.

    Common mistakes

    Measuring the stringer cut instead of the code-defined tread depth. A stringer notched at 9 in can still produce a legal 10 in tread once a 1 in nosing is added, but builders sometimes measure the raw cut and either over-correct or assume they’ve failed when they haven’t. Measure the finished, installed tread from nosing to nosing, not the stringer notch on its own.

    Cutting stringers to exactly 10 in with no allowance for finish materials. Carpet padding, tile setting beds, or an added nosing trim piece can shrink the effective walking depth below the 10 in minimum after the stair is built, even though the bare wood stringer measured correctly. Design 1/4–1/2 in of margin above the code minimum whenever a finish material will sit on top of the tread.

    Letting tread depth vary within a single flight. Field adjustments — nudging one tread deeper to work around a wall or duct — create the same 3/8 in uniformity problem as inconsistent risers, and it’s an equally common inspection failure. Solve the layout on paper first, including any known obstruction, rather than adjusting one tread in the field.

    Ignoring the riser-tread relationship and building the shallowest legal tread regardless of riser height. A 7.75 in riser paired with a bare 10 in tread is legal but produces a steep, tiring stair, since Blondel’s ratio would call for closer to 9.5 in at that riser height — actually shallower, meaning the mismatch runs the other way and the stair reads as unnecessarily long and low for its rise. Check the riser/tread pair together, not tread depth in isolation.

    Related calculators you might need

    Tread depth is only half of a stair’s core geometry — pair it with the riser height calculator to see the full rise/run relationship for a given flight. If you want a single number that tells you whether a riser and tread combination is actually comfortable, run both through the stair comfort formula calculator, which applies the 2R+T ratio automatically. For stairs where the nosing projection affects your measured tread depth, check it against the stair nosing calculator, and confirm the whole flight against local requirements with the IRC stair code checker before cutting.

    Frequently asked questions

    How deep should a stair tread be?

    Most residential stairs use a tread depth of 10–11 in / 254–279 mm. The 2021 IRC sets 10 in / 254 mm as the legal minimum under R311.7.5.2, but that figure leaves little margin for a comfortable stride, so many builders target 10.5–11 in instead. Commercial stairs under IBC 1011.5.2 require a deeper 11 in / 279 mm minimum regardless of riser height.

    What is the minimum tread depth allowed by code?

    For US residential construction, the IRC minimum is 10 in / 254 mm, measured horizontally between the leading edges of adjacent tread nosings, per R311.7.5.2. US commercial buildings under IBC 1011.5.2 require 11 in / 279 mm minimum. The UK’s Approved Document K sets a 220 mm / 8.66 in minimum going for private stairs, and Australia’s NCC requires 240 mm / 9.45 in.

    Does tread depth include the nosing overhang?

    Yes — code-measured tread depth is taken from the leading edge (nosing) of one tread to the leading edge of the next, which means a nosing that projects past the riser face adds to the measured depth. A stringer notched narrower than the code minimum can still produce a compliant tread once the nosing overhang is accounted for, which is why raw stringer cut and finished tread depth aren’t the same number.

    What’s a comfortable tread depth versus the legal minimum?

    Comfort generally starts a half-inch to a full inch above the legal floor. Where code allows 10 in, most designers aim for 10.5–11 in / 267–279 mm because it better accommodates an adult foot without the heel hanging off the back edge on descent. Use the tread depth calculator to check a target depth against both the code minimum and typical comfort range at once.

    Can tread depth vary within one flight of stairs?

    No, not by more than a small tolerance — most codes cap the variance between the deepest and shallowest tread in a single flight at 3/8 in / 9.5 mm, the same tolerance applied to riser height. Field-adjusting one tread to dodge an obstruction is a common source of failed inspections; resolve layout conflicts in the design stage instead.

  • What Is Stair Rise and Run? (And Why the Ratio Matters)

    What Is Stair Rise and Run? (And Why the Ratio Matters)

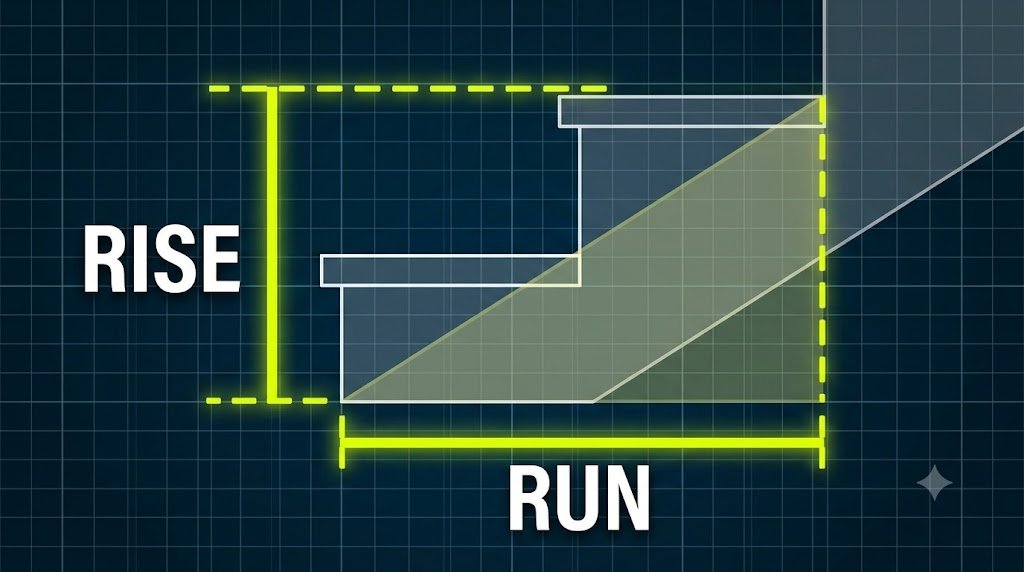
    Rise is how far up one step goes; run is how far forward it goes. Every code limit, every comfort formula, and every stringer cut on a staircase comes back to those two measurements and the ratio between them. Plug your own numbers into the Stair Rise and Run Calculator to get an instant angle and code check, or read on for exactly what’s being measured and why.

    The exact definitions (and where people measure wrong)

    Rise is the vertical distance from the top surface of one tread to the top surface of the next. Total rise is the full floor-to-floor height the whole staircase has to cover — measure it with a level and tape from finished floor to finished floor, not from the subfloor, since flooring thickness changes the number.

    Run (also called going or tread depth) is the horizontal distance from the face of one riser to the face of the next — not the physical width of the tread board. A tread board that overhangs its riser by a 1-in nosing adds visual depth but doesn’t count toward code-measured run, which is why the Stair Nosing Calculator and tread depth are treated as separate numbers on a code check, not interchangeable ones.

    Worked example: 96-in total rise

    A single-story basement stair with a 96-in (2,438 mm) floor-to-floor rise, targeting a 7.25-in riser: 96 ÷ 7.25 = 13.24, so round to 13 steps. Actual riser = 96 ÷ 13 = 7.38 in (188 mm) — under the 7.75-in IRC maximum. Using 2R + T = 24 in for a slightly more compact stair (appropriate for a secondary basement stair where footprint is tight): T = 24 − 2(7.38) = 9.24 in, which is below the 10-in IRC minimum tread depth — so the comfort formula has to yield here and the tread gets set to the 10-in code floor instead, giving an angle of arctan(7.38 ÷ 10) = 36.4°. That’s the practical reality on tight basement stairs: code minimums, not Blondel’s formula, usually end up governing the tread.

    The underlying reasoning: why the ratio, not either number, decides the outcome

    A 6-in riser sounds gentle and a 12-in tread sounds spacious, but paired together they produce a 26.6° stair that many people find awkward — the stride is too long for a natural walking rhythm, so users either shorten their step mid-tread or lengthen it into a stretch. The opposite pairing, a 7.5-in riser with a 9-in tread (39.8°), is compact but tiring and closer to the angle where people start reaching for the handrail on every step rather than just for balance.

    This is the entire reason rise-and-run tools exist as a ratio calculator rather than two separate lookup tables: riser and tread only mean something safety-wise in relation to each other. Two stairs can both individually satisfy IRC’s riser maximum and tread minimum and still feel completely different to climb, because the code sets outer bounds on each dimension but doesn’t mandate a single ideal ratio the way Blondel’s formula does.

    Typical riser/tread pairings by use case:

    Stair typeRiserTreadAngle
    Grand entry / public building25–27°
    Standard interior residential32.5°
    Compact residential (max IRC)37.8°
    Deck / exterior stair30.3–32.5°

    Common mistakes

    Measuring run from the tread board edge instead of the riser face. Overhang and nosing inflate the apparent tread depth. If nosing projects 1 in and the code-counted run needs to hit 10 in, the tread board itself needs to be at least 10 in from riser face to riser face — not 10 in including the overhang.

    Treating total rise as a round number without measuring finished floor to finished floor. Subfloor-to-subfloor measurements ignore the flooring that gets added later (tile, hardwood, carpet pad), which can shift total rise by half an inch or more — enough to throw off a stringer cut made before finishes were selected.

    Picking a riser and tread independently instead of solving them together. Choosing a riser that “looks right” and a tread that “fits the space” separately, without checking the resulting angle, is how stairs end up outside both Blondel’s comfort band and, occasionally, code limits without anyone noticing until the stair is built.

    Ignoring riser-height consistency across the flight. IRC allows a maximum 3/8-in difference between the largest and smallest riser in a run. A stringer cut from a template that’s off by even a small amount at the top or bottom step creates exactly the kind of inconsistency that causes trips — most stair-related falls happen on the first or last step of a flight.

    Related calculators you might need

    Once your rise and run are set, the next step is usually confirming how many total steps that produces — the Number of Steps Calculator takes total rise and a target riser and returns the exact count. If you want to check the resulting pitch against comfort and code limits directly, use the Stair Angle/Pitch Calculator. Solving for one dimension while the other is fixed is easier with the Riser Height Calculator or Tread Depth Calculator, and once the geometry is locked, the Stair Stringer Calculator converts it into actual cut lines.

    Frequently asked questions

    What is the difference between rise and run on stairs?

    Rise is the vertical height of one step; run is the horizontal depth of one step measured from riser face to riser face. Total rise is the full vertical height the staircase covers, while total run is the full horizontal length the staircase occupies — the two are easy to confuse because “run” is used both per-step and for the whole staircase.

    How do I measure stair rise and run on an existing staircase?

    For rise, use a level to find a perfectly horizontal point on one step’s nosing, then measure straight down to the same point on the step below. For run, measure horizontally from one riser face to the next riser face, ignoring any nosing overhang. Do this on two or three steps, since older stairs often have small inconsistencies.

    What is the ideal rise to run ratio?

    Blondel’s formula — 2 × riser + tread = 24 to 25 in — covers most comfortable stairs. A 7-in riser with an 11-in tread (2×7+11=25) is a common residential sweet spot. Run your own numbers through the Stair Rise and Run Calculator to see the resulting angle.

    Can rise and run be different on every step?

    No. Code limits riser-height variation within a single flight to 3/8 in between the tallest and shortest step, and tread depth is expected to be consistent throughout. Deliberate variation is a common cause of missteps, since the body learns a rhythm from the first few steps and expects it to hold.

    Does a bigger tread always mean a safer stair?

    Not automatically — a large tread paired with a small riser can produce a shallow angle that some users find just as awkward as a steep one, since the stride length no longer matches natural walking pace. Safety comes from the riser-to-tread ratio landing inside a comfortable range, not from maximizing either dimension alone.

  • How to Calculate Stair Rise and Run

    How to Calculate Stair Rise and Run

    If you’ve ever stood at the top of a staircase and felt your foot land a half-inch off where you expected, you’ve felt what happens when rise and run aren’t calculated correctly. It’s the single most common mistake in stair building — and almost always avoidable with a little math before the first cut.

    This guide walks through exactly how to calculate stair rise and run, the code limits that constrain your options, and how those two numbers flow into everything else: step count, stringer length, and whether your staircase will pass inspection.

    What “rise” and “run” actually mean

    Total rise is the total vertical distance your staircase needs to climb — floor to floor, or floor to landing. Total run is the total horizontal distance the staircase covers.

    Those totals get divided into individual steps:

    • Riser height — the vertical height of one step
    • Tread depth (unit run) — the horizontal depth of one step

    Get the total rise wrong and every riser in the flight is off by a fraction — which is exactly the kind of error your foot notices even when your eye doesn’t.

    Step 1: Measure your total rise

    Measure the exact vertical distance from the finished floor at the bottom to the finished floor at the top, including the thickness of any subfloor or finish flooring that will be added later. This is the number the rest of the calculation depends on, so it’s worth double-checking with a laser level rather than a tape measure alone.

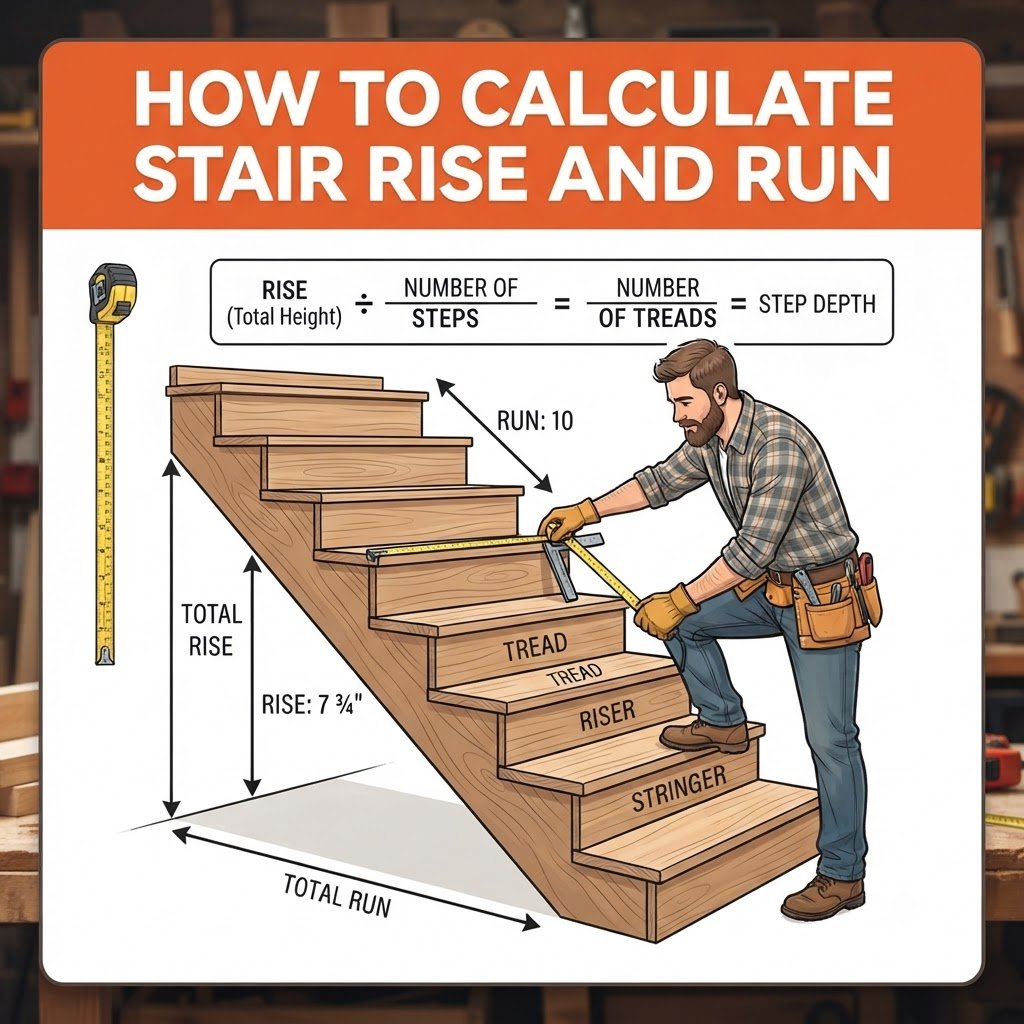
    Step 2: Find your number of risers

    Divide your total rise by a target riser height — most residential codes cap this at 7¾” — and round up to the nearest whole number. That whole number is how many risers your staircase needs.

    Once you have a whole number of risers, divide the total rise by that number again to get your actual riser height. This is the number that keeps every step in the flight identical, which matters more to code inspectors — and to anyone walking the stairs — than hitting a “nice” round number.

    Example: A total rise of 108″ ÷ 7.5″ target = 14.4, rounds up to 15 risers. 108″ ÷ 15 = 7.2″ actual riser height — under the 7¾” code max, and identical on every step.

    Rather than run this by hand, the Stair Rise and Run Calculator does steps 1 and 2 in one pass — enter your total rise and it returns riser count, exact riser height, and tread depth together. If you just need the riser count in isolation, the Number of Steps Calculator handles that alone.

    Step 3: Set your tread depth

    Tread depth is where the 7-11 rule comes in — a rule of thumb (not a code minimum on its own, but a useful starting point) stating that riser height plus tread depth should land close to 17–18 inches. A 7″ riser generally pairs with an 11″ tread; a steeper 7¾” riser pairs with a shallower ~10″ tread. Most residential code sets 10″ as the tread minimum regardless.

    The Tread Depth Calculator applies this ratio automatically against your riser height, and the Riser Height Calculator works the same relationship from the other direction if you’re starting with a fixed tread depth instead.

    Step 4: Check your stair angle

    Once riser height and tread depth are set, your stair angle is fixed — it’s not a separate decision. Most comfortable residential stairs land between 30° and 35° from horizontal; anything steeper starts to feel more like a ladder than a staircase, and anything shallower eats up a lot of floor space for the same total rise.

    Run your numbers through the Stair Angle / Pitch Calculator to see where you land, and if you need to compare that angle against a slope percentage for a permit drawing, the Rise/Run Ratio to Degrees Converter handles the conversion.

    Step 5: Size the stringers

    With riser height, tread depth, and total rise locked in, you can calculate stringer length — the diagonal board that carries the treads. This is also the point where most people discover their staircase needs a landing partway up, since a single stringer can only span so far before it needs intermediate support.

    The Stair Stringer Calculator takes your total rise and run and returns stringer length, cut angles, and how many stringers your stair width needs. If you’ve settled on standard 2×12 lumber for the stringers specifically, the 2×12 Stringer Board Calculator factors in the material’s actual usable depth after the cuts.

    Common code limits to check before you build

    Code requirements vary by jurisdiction and by whether the stair is residential or commercial, but these are the figures that come up most often under the IRC and IBC:

    ElementTypical residential (IRC) limit
    Maximum riser height7¾”
    Minimum tread depth10″
    Riser height variance within a flight⅜” max
    Minimum headroom6’8″
    Minimum stair width36″

    Don’t take that table as final — local amendments change these numbers regularly, and commercial or egress stairs follow a different set of IBC limits entirely. Run your actual numbers through the IRC Stair Code Checker before you build, and if headroom is tight in your space, the Stair Headroom Calculator is worth running early — it’s one of the harder constraints to fix after framing is done.

    Putting it all together

    In order, the calculation flow looks like this:

    1. Measure total rise
    2. Divide by target riser height, round up → number of risers
    3. Divide total rise by that whole number → actual riser height
    4. Apply the 7-11 relationship → tread depth
    5. Multiply tread depth × (risers − 1) → total run
    6. Use total rise and run together → stringer length and cut angles

    Every one of those steps has its own calculator linked above, but if you’d rather not juggle five browser tabs, the Stair Rise and Run Calculator runs steps 1 through 5 from a single total-rise input and shows its work against the cited IRC section at each step.

    Note: These calculators are planning tools, not a substitute for a licensed professional or your local building inspector. Confirm final dimensions against the code your jurisdiction has actually adopted before you build. See our Terms of Service for details.